Wednesday, March 21, 2007
Thursday, November 09, 2006
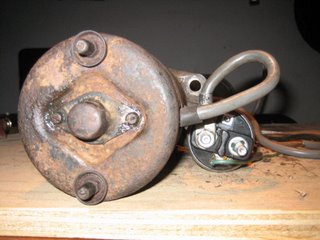
Starter rebuild


IMHO these Bosch starters do not need any grease. There are brass bushings for all the main axle contacts so the most you can do is clean all surfaces well (no grease), apply oil/ or moly/graphite lube liberally and put it back together clean. Pay attention not risk getting any lube in the clutch of the driver/ bindex part of the starter. In retrospect I would say ALWAYS CHANGE THE DRIVER/ BINDEX WHEN YOU REBUILD. Not hard to get but hard to find.
New driver or the bindex was: $29Can+tx.
New Brazilian solenoid for $23 wiped of excess oil/ grease and dressed with moly/graphite. Bosch was $80+ and would take weeks ....so I'm told. I bought the real Bosch torx bolts for the solenoid and replaced the cheap Phillips that nearly mangled before coming out (torch, impact, hammer.)
The shaft of the starter was jammed by particle imbedded grease... very difficult to move by hand even (with no solenoid brush). I cleaned the whole thing with carb cleaner and a toothbrush.... paying special attention to the spiral splines.
It is not easy but do not trust this starter rebuilding work to anybody but the most intrepid shop. That starter I just overhauled was rebuilt by a place in Riviere-de-Loup (wolf river) that specialized in starters and alternators. Not to sound too biter but they were/ are cons..... charged way too much money and didn't do anything but put grease throughout the starter.... not a new solenoid not even new brushes, maybe they turned the com. Do it yourself or order from Bocsh. So watch out!


Wednesday, November 08, 2006
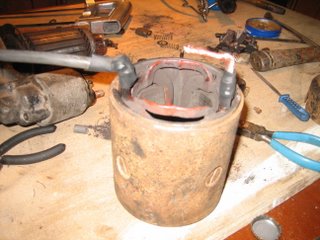
Starter coil rewired

I opened my starter that was "rebuilt" 15 months ago because I was having trouble with the solenoid and found rotten main wires. So I crimped and soldered new ones on. Here is what I did.


Tip: don't try this with a torch or an iron less powerfull than 2-300 watts. The tourch will turn it blue and prevent the solder from sticking and the less powerfull iron will take too long to heat and melt the insulation of the coils. I used silver solder and steel crimps but it is not really necessary just use tin/ lead and tie the joint tight with wire before soldering.
Sunday, October 15, 2006
Images of my AAZ/ WB trany in the Vanagon as promised

Make-shift intercooler with integrated blower in back (unseen)

The first stumbling block..... driver's side motor mount.


Water bottle set up

This image above is one of the other troubles with using a tranny from a Waterboxer. The bracket for the nose of the transmission had to be cut, bent, welded and drilled so the bracket would support the tranny in it's new more forward postion (see original hole on the left.... about 4cm). That.... and changing the shift linkage are the only drawbacks to using these transmissions and why most people if they are buying one will go for one from an air-cooled van.
I already had one so I am going to bust through the trouble.
Sunday, July 23, 2006


Manic-5 dam one of the largest dams in the world (if not still the largest) on the road up north.

One the way to Labrador this is my first Camp on the road up to Lab. city from Baie-Comeau (north Shore). It is outside a modern ghost-town with sub-urban curbs, driveways, central medians on the main road and no evidence of the houses or shops once vibrant.

To kill time while waiting 6 days for the boat to "southern" Labrador I drove camped and swam the rivers of the logging roads. No one goes here. Do not breakdown.
Tuesday, May 02, 2006
suggestion for internal ip pressure
I would like to measure internal IP pressure from the out bolt of my fuel pump after the little screen. I think I would thread the hole in the top of the bolt to fix brakeline to it. I want to do this just to make the pressure measurement and I think it is something I could do without a lathe.


